Scratches you can feel with a fingernail get most of the attention, but the haze that steals gloss is usually far shallower. Micro marring, swirls, and oxidation scatter light. The paint looks dull even after careful washing. Paint correction is the process that clears that distortion, panel by panel, to bring back a crisp reflection without hiding anything under heavy fillers. Done right, the car looks like it was dipped in glass. Done poorly, you cut away clear coat that you can never replace.
I’ve corrected daily drivers that live under oak trees and show cars that never see rain. The needs are different, but the fundamentals don’t change. You evaluate paint thickness, shape a plan around the paint system and defects in front of you, then work methodically with the least aggressive approach that can still meet the goal. That’s the heart of sound exterior detailing.
What paint correction really does
Modern vehicles wear a layered paint system: primer, base color, and a protective clear coat. Most visible swirls and water spots sit in the clear coat, not through it. Paint correction removes a microns-thin slice of that clear to level the surface to the lowest part of the defect. When the peaks and valleys of damage flatten, light stops scattering and gloss jumps.
Two things matter here. First, the paint’s hardness. German clear coats tend to be on the harder side, Japanese clears often a bit softer, and American trucks vary. Second, the defect profile. Rotary trails and random orbital haze call for different pad and liquid combinations than etching from bird droppings. The process is selective abrasion, not a miracle polish that fills and hides.
The risks and why inspection comes first
A proper car detailing service never starts a polisher before measuring and mapping. You cannot correct what you have not fully seen. Step one is decontamination to reveal the actual condition. Iron removers pull embedded ferrous material, a clay media shears bonded contaminants, then a dedicated inspection light shows the damage honestly. I like to look at each panel from at least three angles and switch between color temperatures. The wrong light can hide what the sun will expose.
Paint thickness meters are not optional if you plan to do real correction. Factory clear coat thickness typically leaves a safe working range roughly in the tens of microns, not hundreds. If a hood measures thin, you adjust your target. You might accept 80 to 90 percent defect removal instead of chasing the last trace of a deep scratch, especially on edges and body lines where clear is thinnest. This judgment separates competent exterior detailing from reckless cutting.
The correction ladder: compounding, polishing, refining
I think of correction as a ladder with three main rungs. You start as low as possible and climb only as high as you need.
Compounding removes heavier defects such as pronounced swirls, moderate sanding marks, and etching. It uses a more aggressive pad and a compound with larger, fast-cutting abrasives. It also leaves its own haze, which is normal. On a hard clear, a microfiber cutting pad with a low-dusting compound can level issues quickly. On a softer clear, a foam cutting pad reduces marring.
Polishing follows. Medium and finishing polishes use finer abrasives to clear the haze left by compounding. This stage restores clarity. Many owners are surprised at how big a jump in gloss they see here, because now the light is returning in a uniform way. On a well-kept car with mild swirls, you might skip compounding and start here.
Refining is about squeezing the last bit of crispness. Ultra-fine finishing polishes, very soft foam pads, slow arm speed, and moderate pressure bring the paint to a near liquid look. On darker colors, this pass pays dividends. On white or silver, diminishing returns come sooner, so the plan changes.
Tools matter, but technique decides the outcome
Dual action polishers are the workhorse for paint correction. They are safer on edges, minimize heat spikes, and leave little risk of holograms. Rotaries cut fast and can deliver stunning clarity in trained hands, but they are unforgiving. I carry both, but I always pick based on the panel and the target finish. Tight bumpers, pillars, and mirror caps benefit from smaller machines.
Pad choice is its own discipline. Microfiber pads cut faster but can leave micro-trails on soft paint. Foam varies widely in firmness and cell structure, from heavy cutting to ultra-soft finishing. Wool pads have made a quiet comeback for certain clears that clog microfiber or push back on foam. Keeping pads clean during the job matters as much as the initial selection. A matted, product-saturated pad loses bite and adds heat. I blow out pads with compressed air after each section pass and switch pads often.
Polish behavior shifts with temperature, humidity, and paint chemistry. Some compounds like more pressure and short working cycles; others like light pressure and longer open time. You learn to watch residue. If it goes transparent too soon, you are out of liquid or you overworked it. If dust explodes everywhere, rethink your product, your pad, or your machine speed.
Surface prep is half the result
Before any machine touches paint, the surface must be surgically clean. Decon starts with a thorough wash, then chemical decon to dissolve embedded brake iron and paint fallout. A proper clay pass follows, using a clay bar or synthetic clay media with a dedicated lubricant. You want the paint to feel slick under the clay and the media to glide. Any drag signals contaminants that will interfere with correction and possibly mar the surface further.
Taping trim, edges, and sensitive plastics saves headaches. Compounds and polishes stain porous trim. Tape also protects sharp edges where clear is thin. On some vehicles, I remove license plates and the occasional emblem to level paint uniformly. The prep time pays back in both speed and quality once you start polishing.
How far is far enough
Not every car needs multi-stage correction. The right standard is the use case, not a showroom fantasy. A commuter car that lives outside and gets washed at home might be best served by a one-step polish that removes 50 to 70 percent of visible defects, followed by a durable protection layer. A weekend car with black paint and garage storage justifies a multi-stage correction that pushes into the 90 percent defect removal range.
You set expectations with an honest inspection and, where possible, a test spot. A test spot is a small, representative section you correct fully using the planned process. It confirms that the liquid, pad, and machine combo delivers the requested finish on that paint. It also shows how long the work will take. If the test spot fights you, you adjust. That small investment avoids surprises halfway through the roof.
Protection after correction
Freshly corrected paint is vulnerable. You have leveled the surface and exposed fresh clear, which is more willing to accept protection. This is the time to seal, wax, or apply a coating. Traditional sealants provide several months of hydrophobic behavior and a pleasant slickness. Waxes add warmth to the look, especially on darker colors, but wash away sooner.
Ceramic coatings raise durability significantly, measured in years rather than months when maintained correctly. They add chemical resistance and make washing easier, but they do not stop swirls by themselves. The paint underneath still requires careful wash technique. For clients who want a deeper maintenance cycle, a coating matched to the vehicle’s use pattern makes sense.
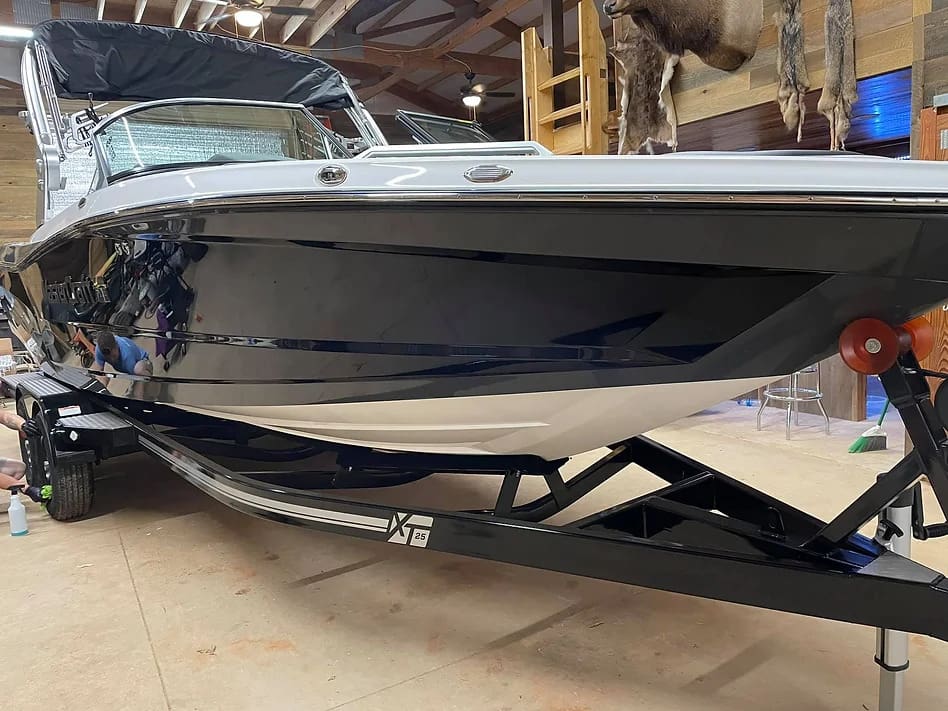
On boats, the protection conversation shifts. Gelcoat is harder and more porous than automotive clear. It oxidizes in a different way under sun and salt. After marine detailing and oxidation removal, a marine-grade sealant or a boat ceramic coating helps seal pores and slow the chalky fade. Expect a different maintenance rhythm on the water, where UV load and mineral deposits are constant pressure.
Where Hugo's Auto Detailing fits in the process
I have met owners who came to Hugo's Auto Detailing after trying to fix swirls with over-the-counter compounds and a big-box polisher. They did not fail from lack of effort. They lacked two things: a measurement-based plan and the right combinations of pads and liquids for their specific paint system. In one recent case, a deep blue sedan from Car detailing Montecito arrived with heavy buffer trails from a previous attempt elsewhere. We mapped the paint, found thin clear on the hood at the center crown, and decided against aggressive cutting there. The final approach used a mild compound on a finishing foam pad, then a two-step refine. The result was a near mirror, and the clear remained https://sethfars747.lucialpiazzale.com/ultimate-guide-to-exterior-detailing-shine-and-protection-that-lasts within safe margins.
Clients from Car detailing Goleta and Car detailing Carpinteria often bring daily drivers with significant wash-induced marring. For those, our team leans on one-step polishes that cut and finish impressively when paired with the right pad. These are the workhorses for exterior detailing with reasonable time budgets. Hugo's Auto Detailing keeps multiple brands of liquids on hand because paint chemistry varies. When a Honda’s softer clear reacts differently than a BMW’s harder finish, we switch not philosophies, but abrasives.
Why washing technique decides the paint’s future
The most perfect correction will not survive a harsh wash routine. The enemy is friction. Dirt on the paint is abrasive, and dragging it around creates new swirls. Touchless pre-rinsing to remove loose grit, then a gentle contact wash with a plush mitt and lubricated shampoo reduces that friction. Two-bucket methods help, but the principle matters more than the ritual: always refresh your mitt in clean water before you reload with soap, and never scrub contaminants across the surface. Drying is another danger zone. Use forced air when you can, and blot or glide a clean drying towel with minimal pressure. The safer you wash, the longer your correction lasts.
For boat owners thinking about a boat detailing service, rinsing after every outing makes a difference. Salt crystals and mineral deposits baked by sun etch surfaces. A quick freshwater rinse, especially along waterlines and metal fittings, buys years of good looks. When oxidation shows on gelcoat, you address it before it deepens. Gelcoat can be compounded harder than automotive clear, but you still treat edges and seams with care.
Edge cases: repainted panels, PPF, and vintage single-stage finishes
Not all paint is factory clear over base. Repainted panels are common. Body shops vary in film build and curing. Some repaints are soft for months, others become rock hard. You approach them with caution and verify heat buildup frequently. A paint thickness meter can show a thick reading that tempts aggressive cutting, but remember that the clear thickness portion is still the limiting factor.
Paint protection film changes the playbook. You do not compound PPF like paint. Light polishes can improve minor marring on some films, but aggressive abrasives can cloud or remove the top coat. If a vehicle has mixed surfaces, like a front end wrapped in PPF and the rest in clear coat, you switch pads and pressure at those boundaries. Mask the edges so an aggressive pad does not catch and lift the film.
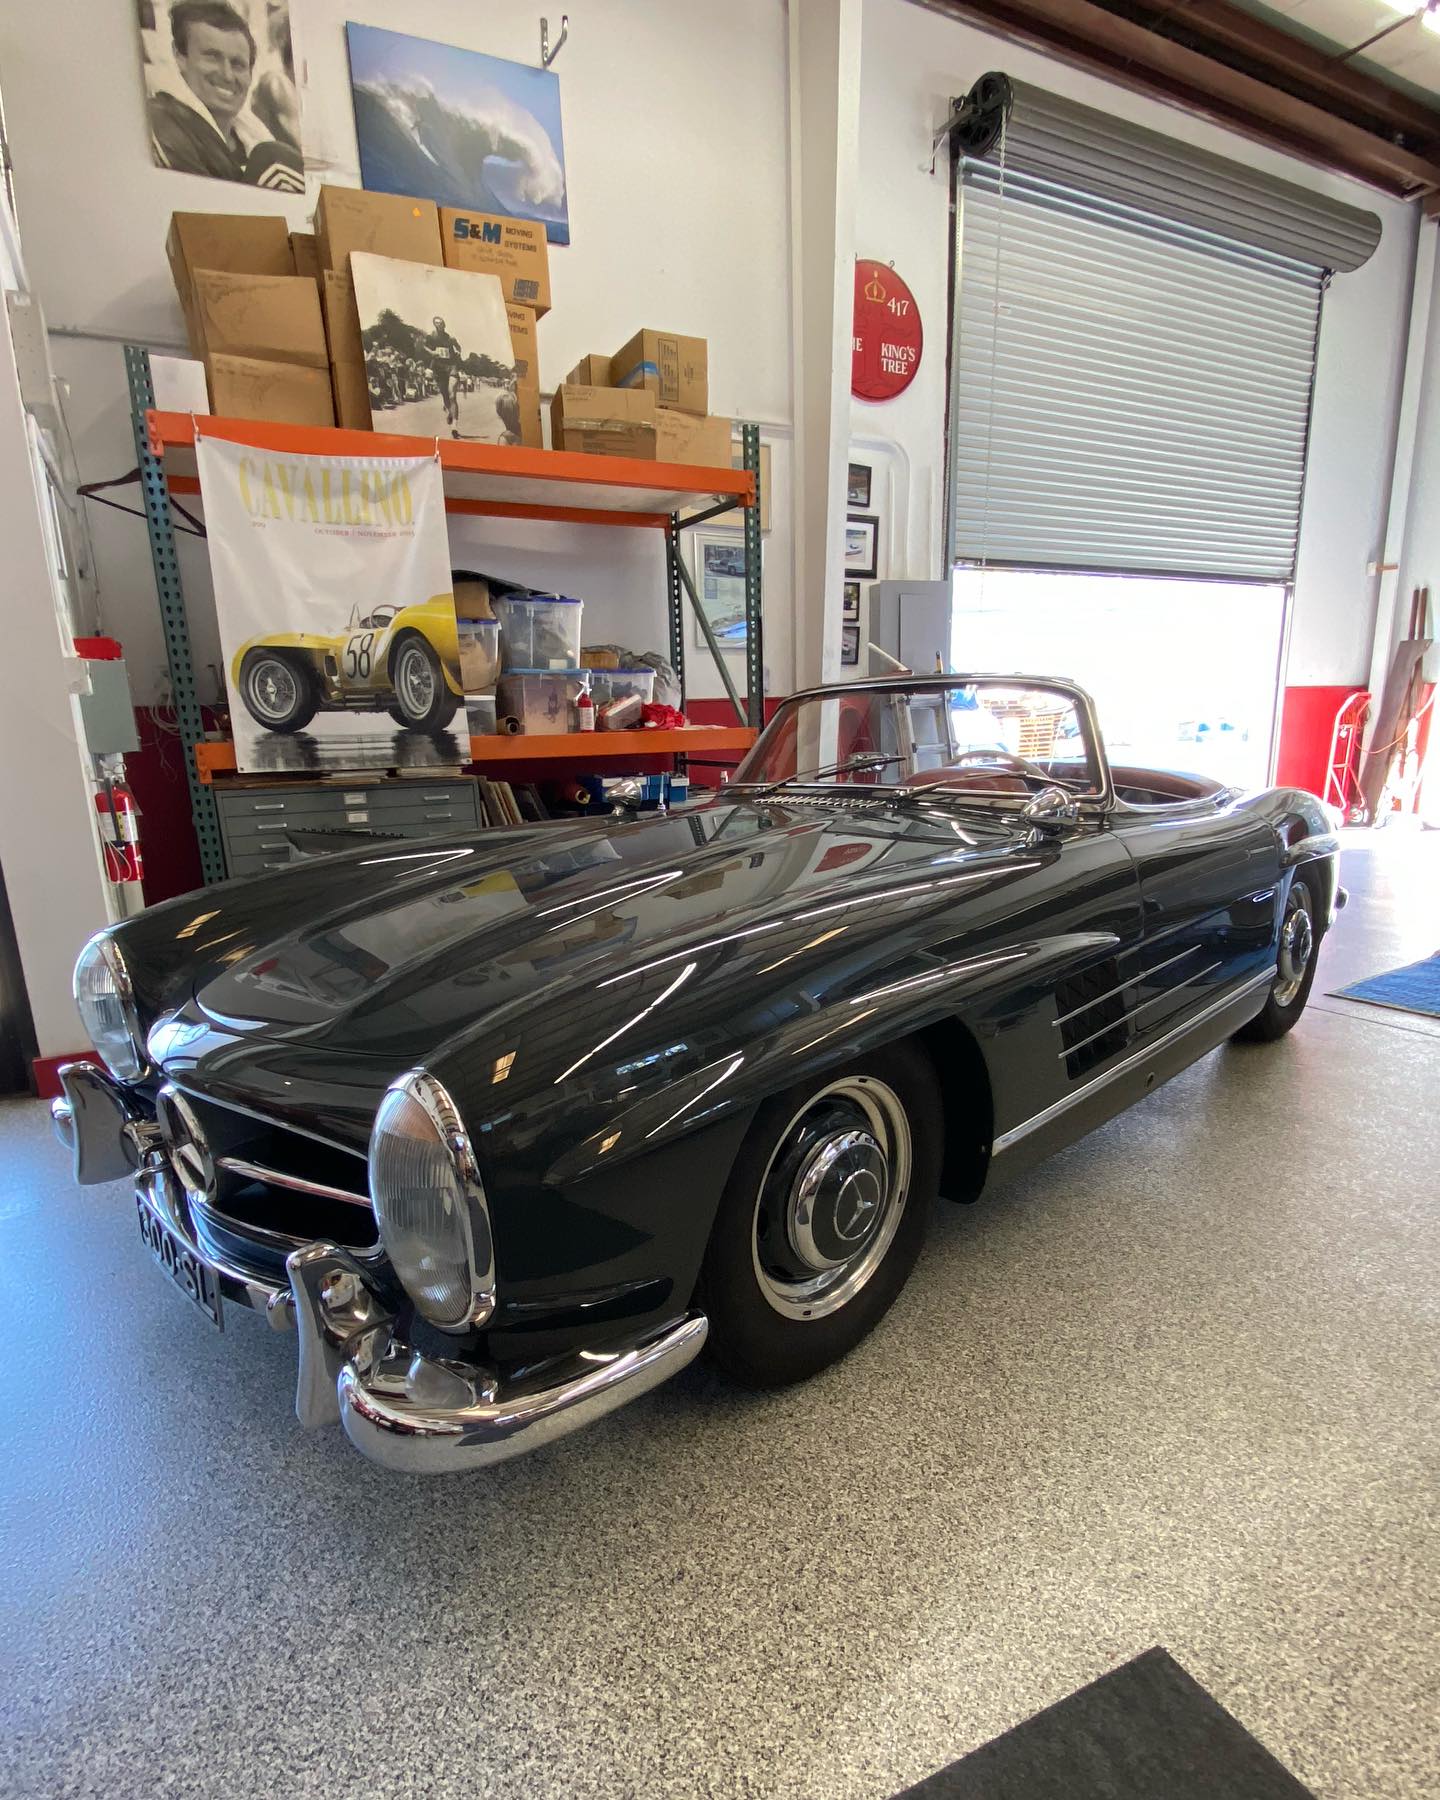
Vintage single-stage paint responds beautifully to proper correction, but it also transfers color to the pad. That is normal, yet it demands patience and frequent pad cleaning. Oxidation can be stubborn. You sometimes need several light passes instead of one heavy one. You can also finish with a glaze if the owner prefers a warmer, period-correct look, knowing that a glaze is largely a temporary cosmetic and not structural protection.
When less is more
Sometimes restraint earns a better long-term result. On a work truck from Car detailing Hope Ranch that spends time on dirt roads, we accepted a light to moderate correction and put time into protection and wash-friendly finishes. Chasing perfect clarity on a surface that will be hammered weekly is a short victory. In those cases, you allocate the budget to regular maintenance, interior detailing to keep the cabin sanitary, and durable sealants that refresh quickly.
Inside the cabin, correction shows up in a different way. Piano black trim and glossy interior plastics scratch if you look at them wrong. You can improve them with very fine polishes by hand or with a micro tool, but you never push. Leather, soft-touch surfaces, and screens demand non-abrasive methods. Interior detailing is a separate craft, yet it intersects with paint correction values: clean first, inspect under proper light, and use the least aggressive method that works.
The local cadence: salt air, sun, and oak sap
Where a car lives determines how you schedule care. In coastal areas, vehicles from Car detailing Summerland and Car detailing Montecito see salt-laden air and constant UV. Clear coat oxidizes faster in this environment. Regular decon and protection renewals fight that. Oak sap and bird fallout in some neighborhoods add localized etching. If you park under trees out of necessity, a light quick detail spray and plush towel in the trunk can save a finish when you cannot wash right away. Remove the offender gently, then plan a more thorough clean soon.
For boat owners scheduling a boat detailing service, dock rash and fender rub create scuffs that look worse than they are. Many of these polish out of gelcoat if addressed promptly. Time matters, because UV opens pores in gelcoat, and stains migrate deeper. Marine detailing has its own rhythm. Work above the waterline with the boat on a trailer or lift when possible, and remember that a boat ceramic coating can cut maintenance time dramatically if applied after a thorough oxidation removal.
A day in the shop at Hugo's Auto Detailing
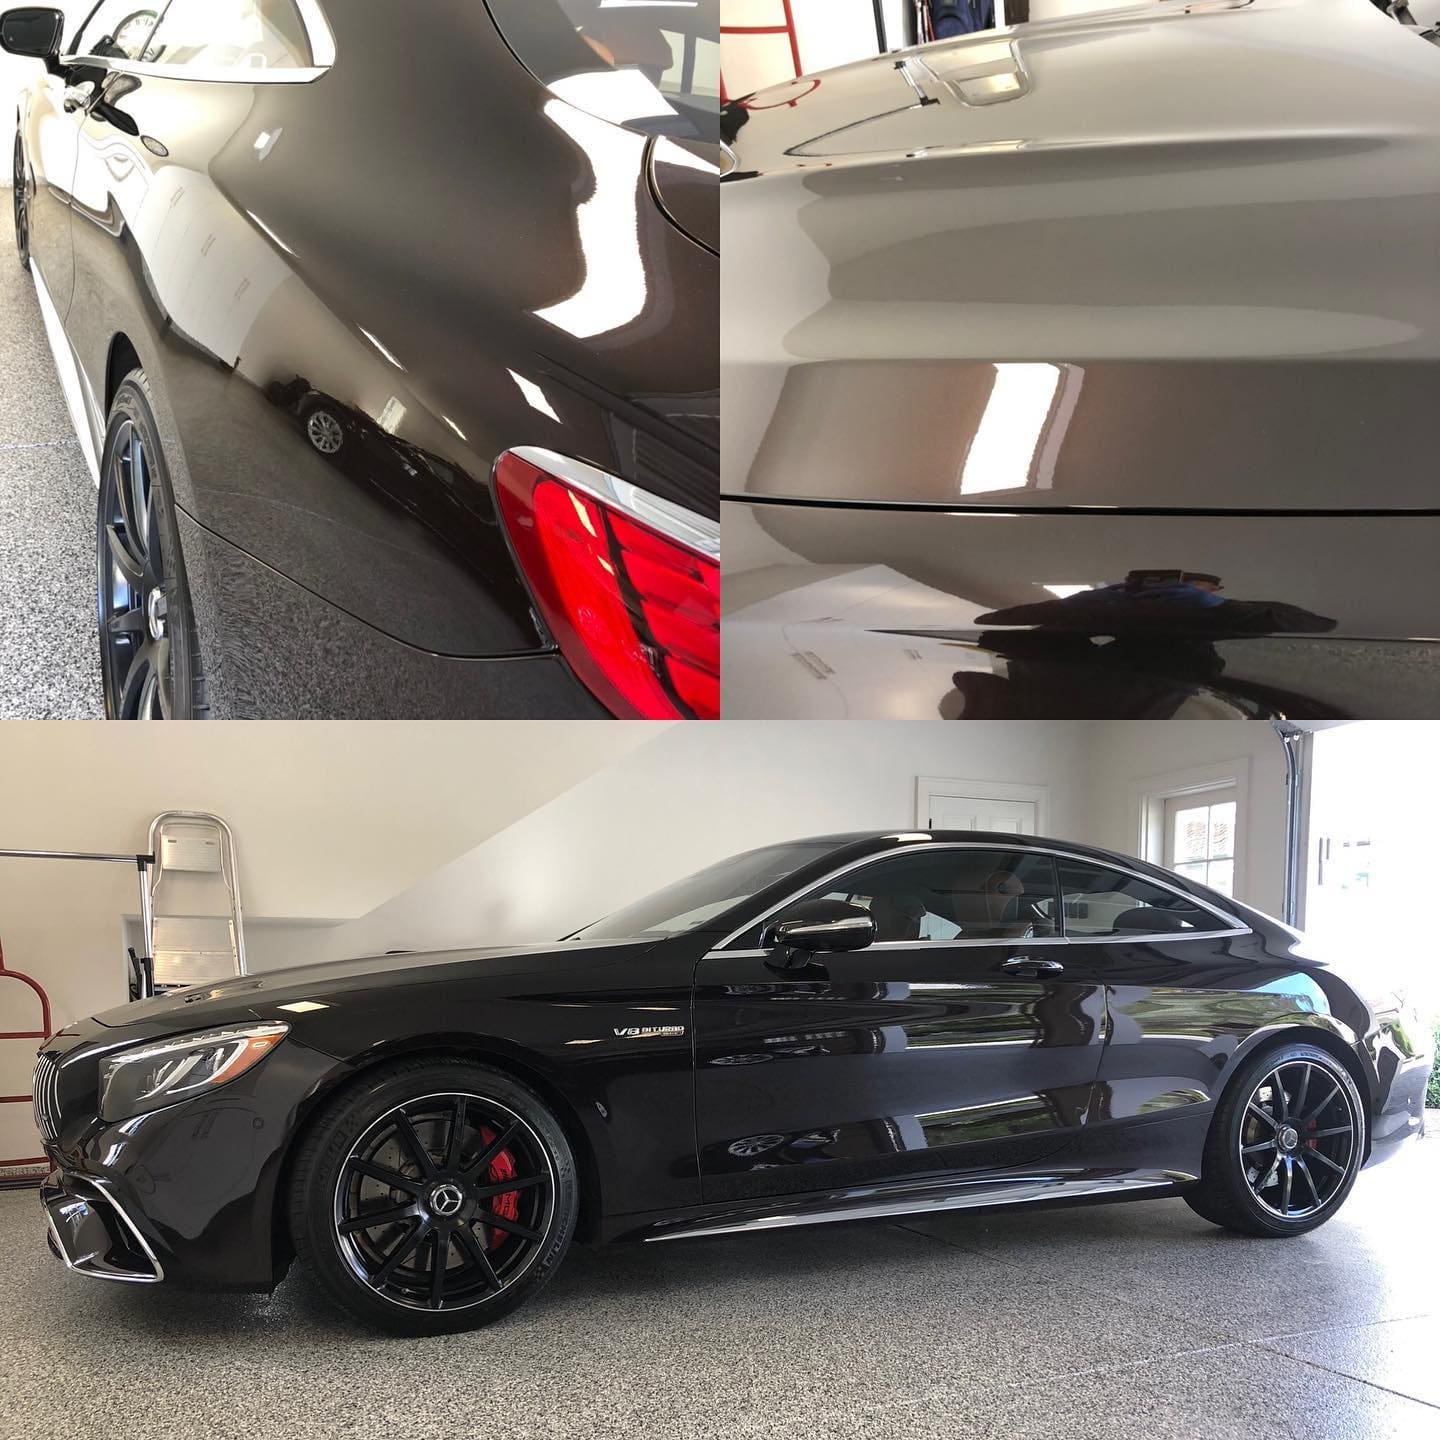
A black coupe arrived from Car detailing Carpinteria with heavy swirl marks, light water spot etching on the hood and roof, and hazy tail light lenses. After wash and decon, we measured paint across each panel. The readings ranged from 105 to 135 microns, typical for factory paint in good shape. Edges measured thin, so we taped generously. A test spot on the trunk lid with a microfiber cutting pad and a low-dusting compound removed roughly 90 percent of defects but left a faint haze. We refined with a soft foam pad and a finishing polish that loves slower machine speed and lightweight pressure. Under the sun, clarity returned and the metallic flake looked three shades deeper.
Tail lights responded to a gentle two-step with plastic-safe polishes. We protected the paint with a mid-term sealant rather than a coating because the owner liked to refresh protection quarterly and wanted to keep options open. We closed the day with a careful rinse and a soft wipe-down to remove any residue. The owner’s first question was how to keep it looking this way. The answer was simple: careful wash technique, shade when possible, and a maintenance plan that matched the car’s use.
Choosing your correction scope without guesswork
You decide on a strategy by balancing three factors: paint health, desired finish, and maintenance reality. Paint health sets boundaries. Desired finish sets the bar. Maintenance reality keeps you honest. If you love black paint but cannot maintain it gently, aim for a high-quality one-step and a robust protection layer, then revisit periodically. If you can garage the car and wash with care, a thorough multi-stage correction followed by a ceramic coating makes sense. Boats follow the same logic with different timelines because UV and minerals move faster on the water.
At Hugo's Auto Detailing, we often document a test spot with photos under identical lighting. That way, owner and technician agree on what “good” looks like before the polisher ever moves to the next panel. For clients who split time between daily driving and weekend shows, we treat high-visibility panels to a higher level while taking a lighter approach on lower, high-impact zones that collect road rash. That targeted approach preserves clear where it matters.
Maintenance after the glow
After any paint correction, your maintenance kit should be simple: a pH-balanced shampoo, two or three high-quality wash mitts, several plush drying towels, a gentle drying aid or detail spray that adds slickness, and separate towels for wheels and lower, dirtier sections. Store everything clean and dry. Replace towels that pick up grit or lose softness. Wheels and tires deserve their own brushes and towels. Cross-contamination is the mother of new swirls.
For coated vehicles, avoid strong chemicals unless there is a specific need, like tar or heavy iron fallout. Use coating-safe toppers and keep to a steady wash cadence. For sealed vehicles, refresh the sealant every few months or after decon. Boats should be rinsed after outings, dried when possible, and periodically refreshed with a marine sealant or topper to keep water beading and grime from anchoring.
The difference you can measure and see
Good correction is visible in harsh light and soft light. Under the sun, you should see a tight, crisp reflection without haloing. Under shop LEDs, you should see minimal haze when the panel is tilted. Measurable difference shows up in gloss readings if you use a gloss meter, but most owners do not need the number when their eyes tell the story. What you should not see is thin edges, burned trim, sling in crevices, or residue in badges.
Whether you are pursuing a full paint correction or a measured cleanup to freshen a daily driver, the route is the same: inspect, test, select the least aggressive effective method, work clean, refine, and protect. If your life includes docks and salt, build marine detailing into your rhythm with products and expectations tuned to gelcoat. If your life runs through neighborhood streets and grocery lots, focus on safe washing and timely protection.
Paint correction is not about chasing perfection for its own sake. It is about restoring honest gloss and then keeping it with smart habits. The path there is practical, repeatable, and rewarding when the car or boat catches the light the way it should.